


Remote Access
Access your remote desktop from any device, anywhere.
 Simon Brown • Mar 21, 2024
For professionals like photographers, videographers, content creators, and journalists, transferring videos from iPhone to Mac is crucial for their workflow. They may need to transfer footage for post-production processing, such as editing in advanced software, sharing on public platforms, or delivering to clients. Besides, they transfer video from iPhone to Mac to watch video on a more high-quality display and get an immersive viewing experience.
Since the iPhone has limited storage for handling high-resolution videos, many people prefer to transfer their footage to a Mac for long-term archival and preservation purposes. Through this article, let's learn how to transfer videos from iPhone to MacBook through wireless or wired paths.
Wireless transfer methods offer greater mobility and flexibility to users from anywhere and are practically suitable in environments where physical connections are impractical. Therefore, this part will show you how to send videos from iPhone to Mac wirelessly without keeping both devices near for sharing.
The easiest and fastest method to transfer video from iPhone to Mac is using Avica remote desktop software, which doesn't require you to keep devices nearby. This software allows users to access and control devices remotely, even from other regions. Similarly, they can transfer videos without being physically present near the remote devices.
All this media transfer process is end-to-end encrypted with AES-256 encryption, which means you can share files securely between operating systems and mobile devices. What’s more, Avica makes unlimited video transfer possible, and you can also conveniently transfer your large videos.
Avica features a patented protocol for high-speed transfer, allowing you to move high-resolution videos in seconds and save time for editing. Since it’s a remote desktop app, it offers several other features for high-end remote communication, so discover a few of them from below.
As discussed earlier, using Avica is very simple due to its intuitive interface, which doesn’t require any prior technical knowledge. Let’s prove this statement through the following steps guiding you on how to take videos from iPhone to Mac.
Feel free to easily download Avica software by clicking the button below or download Avica mobile app from Google Play and App Store. If you require additional information about Avica product downloads, please visit the dedicated Avica download page. Rest assured, Avica guarantees safety and ensures that all products acquired from their official website or app store are free from viruses. You can confidently download Avica from these trusted sources.
Launch Avica on both your devices and sign in to them using your credentials to initiate the process. From your Mac screen, enable the “Allow Remote Access to this Device Via Your Credentials” option. Note the displayed “Avica ID” along with the password and move toward your local iPhone to establish a file-transferring connection.

Insert the “Avica ID” under the “Remote Connection” section on the iPhone and hit the “File Transfer” button.

Then, input the Password, press the “Send File” option, and choose the “Photos” option to navigate into your iPhone’s gallery. Afterward, start selecting your videos to transfer and tap the “Add” option to proceed to share. Next, choose a location on your Mac to save the video and use the “Send” button to transfer the selected videos.

It is the most convenient method to transfer media among Apple devices, but it requires you to use OS X Lion or later and iOS 7 or later devices. For this process, ensure that you enable Wi-Fi and Bluetooth on both devices and then consult the next steps demonstrating how to import iPhone video to Mac.
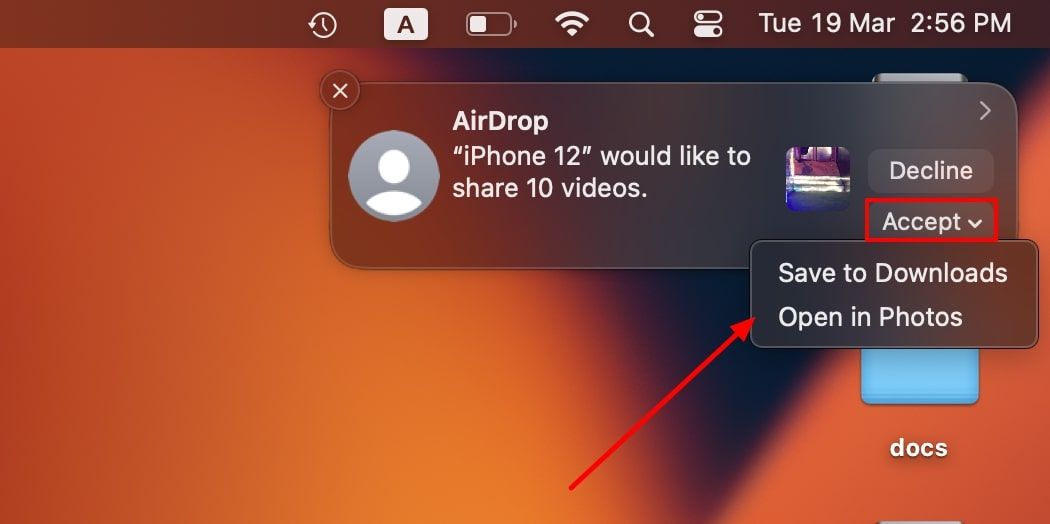
Step 1: In the Photos App, select the videos you wish to transfer and press the “Share” icon. From the next display, tap the “AirDrop” icon to find the Mac device and tap on it to send a request.

Step 2: Go to your Mac device and click the “Accept” button that appears as a pop-up. Then, you will see two options appearing as a drop-down list to choose one as desired.
With enough storage on iCloud and a strong internet connection, you can sync your videos between iPhone and MacBook using Apple ID credentials. Let’s initiate this process through the following steps on how to transfer videos from iPhone to Mac.
Step 1: Through your Mac’s web browser, access iCloud.com and sign in to your iPhone using Apple ID. After successfully signing in, click the “Photos” widget there and preview all the media of your iPhone Photos app on Mac.

Step 2: Select the videos that you want to transfer and locate the “Download” icon at the top right side. Click on it, and your chosen videos will instantly be saved on your Mac device.

Cloud storage, such as Google Drive and Dropbox, are well-known storage spaces that can store files and media for more extended periods. You can use any of them to upload media from your iPhone and download it anywhere by signing in to your account or using the share link. If you are interested in discovering how it works, head down to learn how you transfer videos from iPhone to MacBook.
Step 1: Open Google Drive on your iPhone and choose a folder to upload your video or create a new one. After selecting a folder to upload the video, press the "+" icon and tap the "Upload File" option from the extended menu. Then, hit the "Photos and Videos" option and navigate to your media in the Photos app. There, pick videos and proceed with the "Upload" option from the top-right side.

Step 2: As your videos get uploaded to your iPhone Google Drive, head to your Mac device and sign in to the same Google Drive account. Open the folder in which you have uploaded the iPhone videos and right-click on the media to get a drop-down list. Finally, click the “Download” option and save your videos on your Mac once the processing finishes.

Step 3: To use Dropbox, set up your account on Dropbox and tap the "+" button from the bottom to upload your video. Once it gets uploaded, press the “Three Dots” icon and choose the "Share" option from the extended menu. Then, use the "Copy Link" button and share the URL link with the Mac device to download the video.

As you have learned various ways of video transferring wirelessly, let us remind you that those ways consume cellular data or need an active Wi-Fi connection. Some people are also concerned about their data security, so this part will highlight ways how to copy video from iPhone to MacBook in wired ways.
This default application in Mac is designed to organize, edit, and share media between macOS and iOS devices with the integration of iCloud storage service. Use the given steps to explore how to put videos from iPhone to Mac, but first, get an Apple-certified cable to connect both devices.
Step 1: Connect your iPhone with your Mac through an Apple-certified cable and open the Photos app on your Mac. Now, an “Import” screen will display automatically to select videos for the transfer process.
Step 2: Manually choose videos to transfer and locate the "Import Selected" button at the top right side. Use it to transfer the selected videos, or if you wish to move all the videos, hit the "Import All New Items" button.

Image Capture is a built-in application dedicated to media transferring from iPhones to Macs by connecting them via Apple-certified cable. The following steps will illustrate how to move video from iPhone to Mac seamlessly without an internet connection.
Step 1: As you connect the iPhone with the Mac, run Image Capture and select your iPhone from the left side panel.
Step 2: Wait until Image Capture loads your media and then start selecting videos for transfer to Mac. Now, navigate to the bottom and specify a destination on your Mac using the “Import To” option. Afterward, click the “Download All” button, and videos will be saved at your designated place on your Mac.

Finder is a default Mac file management application that can quickly navigate to different files and folders. Although it’s not a simple method of transferring media, it’s still one of the working methods that you can try through the given steps to transfer video from iPhone to MacBook.
Step 1: Access the Photos app on your iPhone and tap the “Share” icon after choosing videos to share. Following that, use the “Save to Files” option and choose one app to save the video through the “Save” button.

Step 2: Go to the Finder app, select your iPhone from the left panel, and choose the “Files” tab to locate the app in which you have saved the videos. Tap the "Arrow" icon next to that app, drag the video that appears below it, and drop it on your Mac device.

Before you practically start transferring videos from iPhone to Mac, read the given common queries and their in-depth answers to ensure a smooth experience.
Yes, you can share larger files from iPhone to Mac devices, and there are several convenient ways to do so. Among them, the most appropriate is Avica remote desktop software that can transfer larger files, videos, photos, and other documents without compromising quality. Besides, there is no limit to transferring files of media, which means you can share your entire iPhone gallery in seconds.
Generally, AirDrop does not impose strict file size restrictions, but the process entirely depends on the device's capability and storage. If you ever fail to transfer large-size videos via AirDrop, that means your devices are not nearby or have limited storage. Many users report that sharing larger files between Apple devices using AirDrop is challenging, so it's suggested that other ways be used for transferring data.
Upon reading this guide, you are now familiar with all the possible methods of importing video from iPhone to MacBook. They were the standard methods for moving videos, but some required an Apple-certified cable, and some took a long time to transfer the media. For a faster, secure, and reliable method, you should use Avica remote desktop software that has a user-friendly interface and offers blazing-fast file transfer speed.

Connect Everything, Work Anywhere


